
This story begins like so many others, buying crap online from the Amazon’s Amazon, Mercado Libre. In this case, I bought a bunch of cheap solid state relay modules based on the G3MB-202P module by OMROM for my hobby home automation projects.
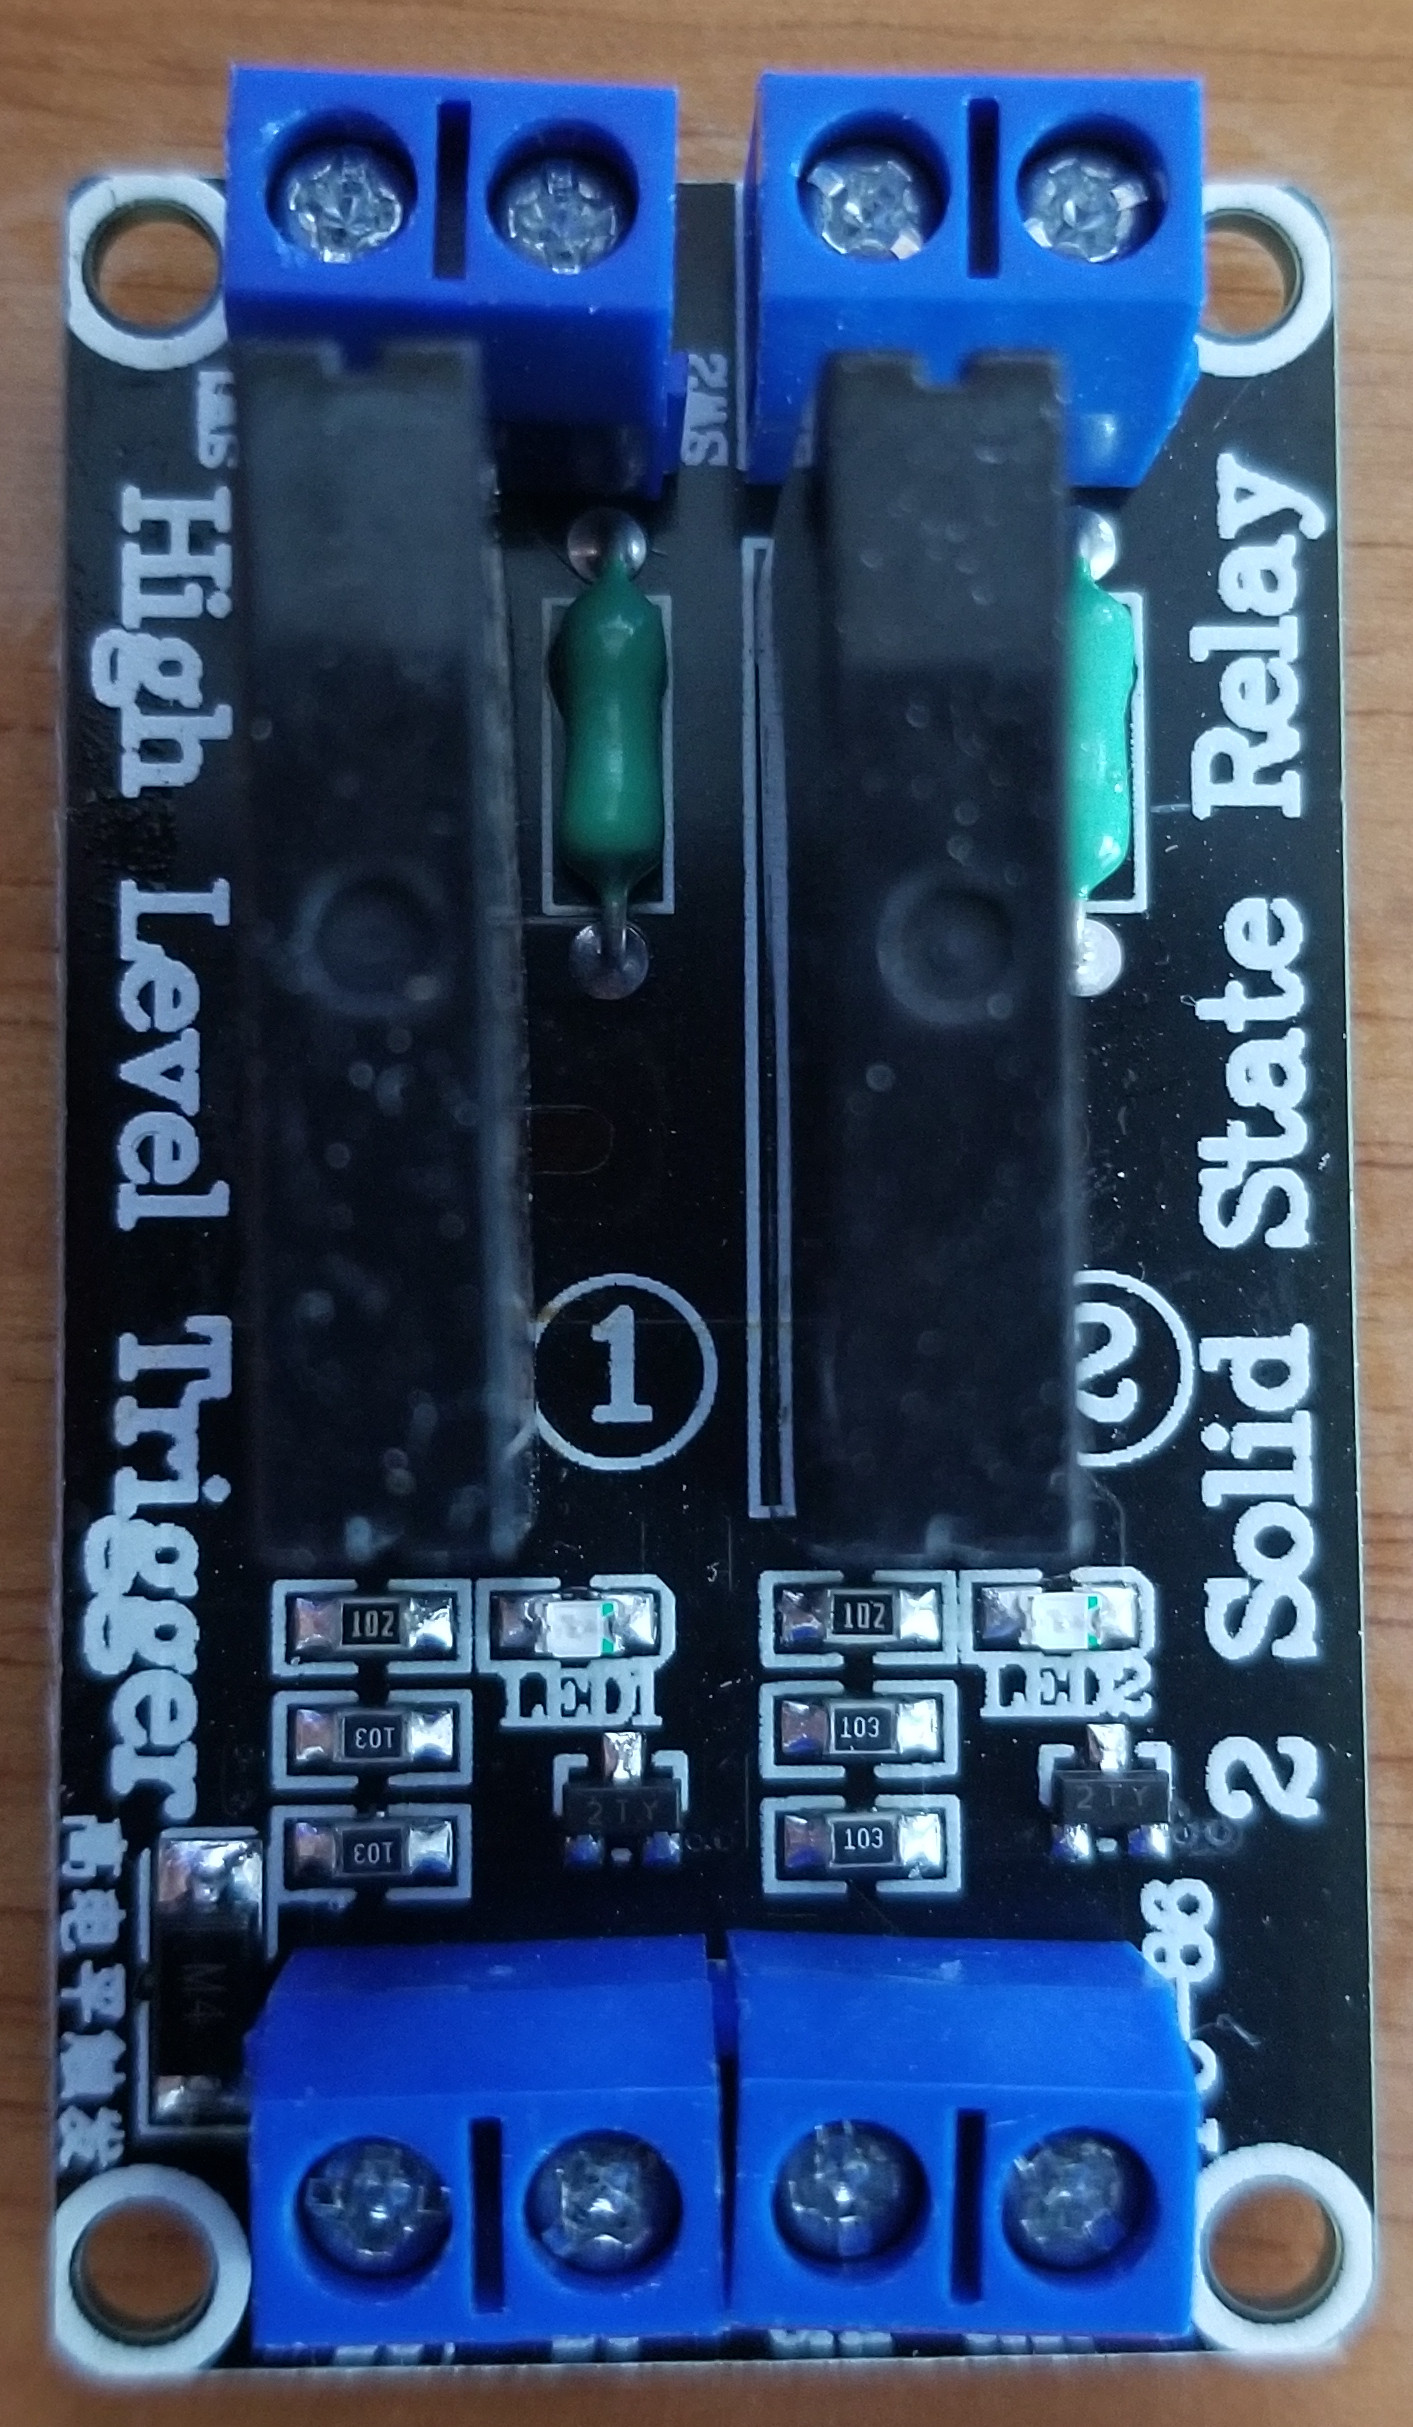
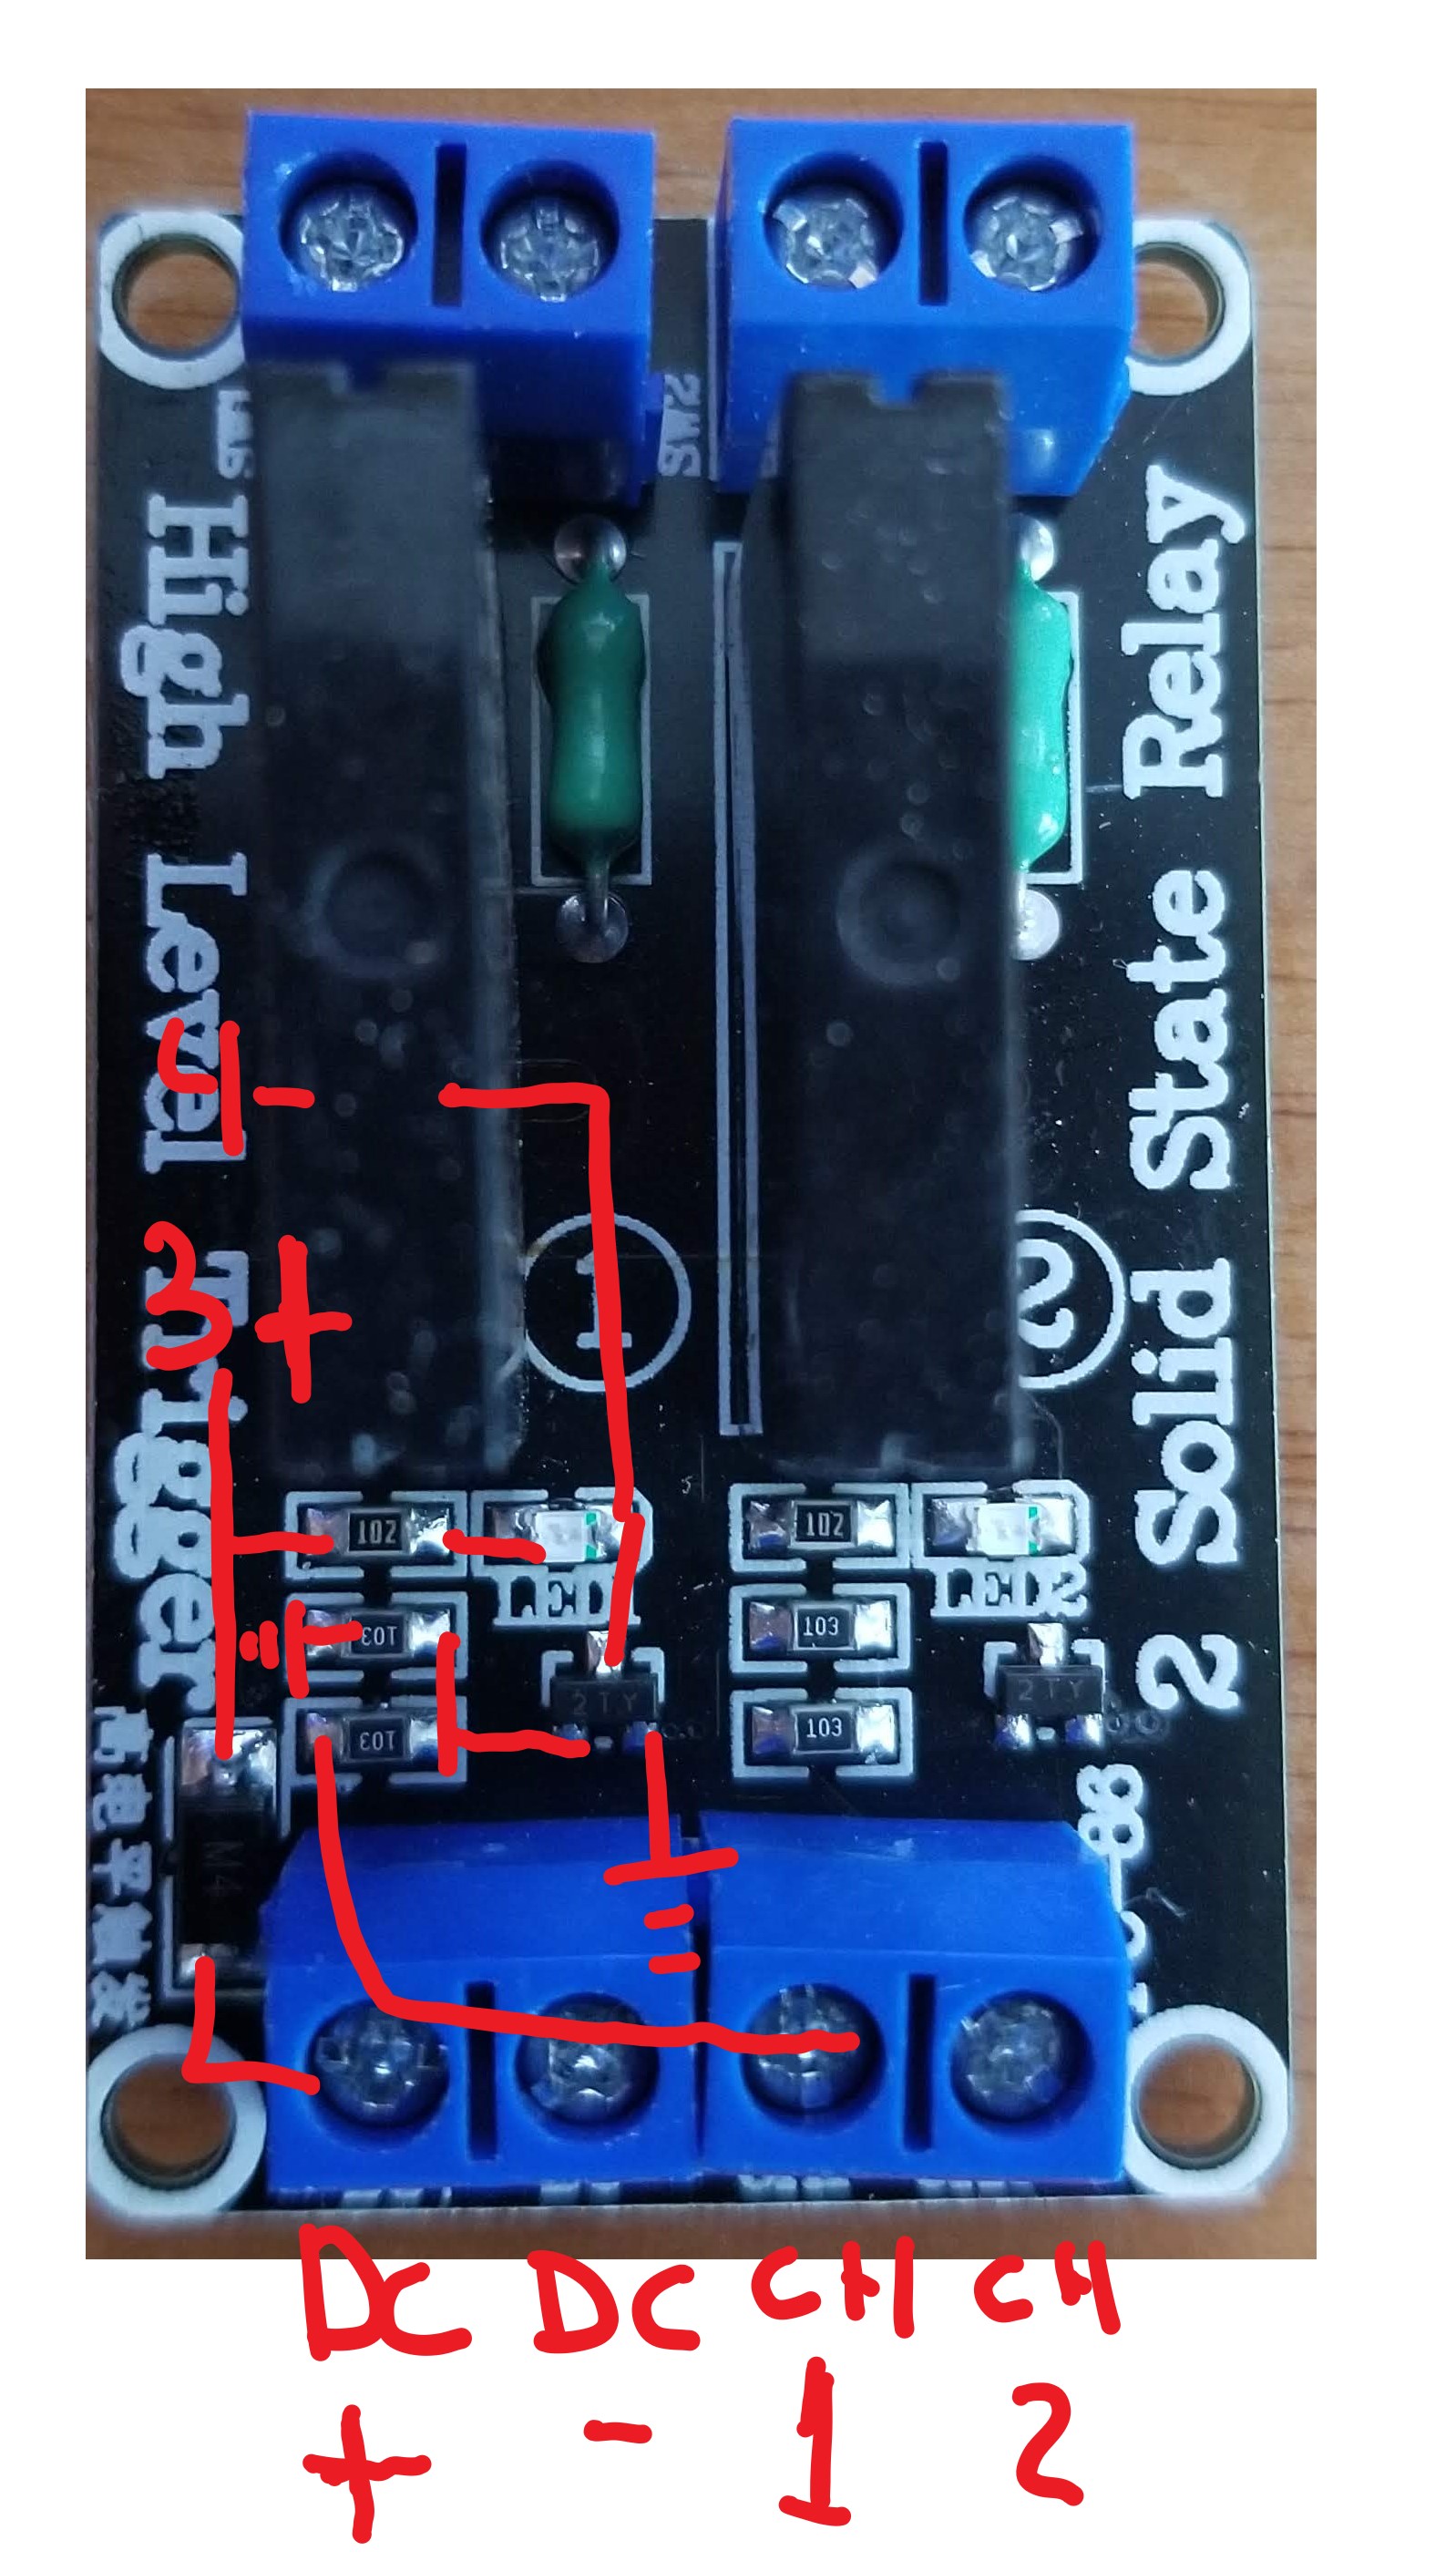
Innocent me, I never thought of testing these out before using them(they look simple enough it’s hard to mess them up), so I simply hooked them up to 5V to DC+, GND to DC- and a ESP8266 GPIO to CH1. Then I plugged in a motor on the SSR output, flipped the GPIO and expected it to move and stop…it did not.
I suspected the module was faulty, so I tried another one. And another one. None of them seemed to work…They lighted up the LED, but nothing in the world made the output work. So I now suspected the ESP8266…I removed it, by simply hooking and 5V to CH1 and CH2, hooked up the AC to the output and lo and behold, it didn’t work either.
It also did strange things, like, if CH1 and CH2 (the control inputs) were left floating, the LED would light up (but the output wouldn’t work). If CH1 or 2 was connected to GND, the LEDs would turn off…but also no output.
Next up, I suspected 5V was not enough, after all I measured the voltage at the G3MB pins and it was 4.4V due to a diode in series (more on that later)…I cranked up the voltage…5.5 and it didn’t work…6…it didn’t work…6.5 and …it started working! The light bulb I hooked up turned on when I put a high value on CH1 and it turned off otherwise. That was great, but why was it working at that voltage and not 5V?
I reviewed the publication on Mercado Libre, it was clear it was meant to work at 5V.
This should’ve been the time when I was supposed to return these clearly faulty boards untouched. That would’ve been the smart choice.
Instead, I made a schematic by testing points…it looks like this:
I looked online for G3MB circuits and what do you know, I found just the thing:
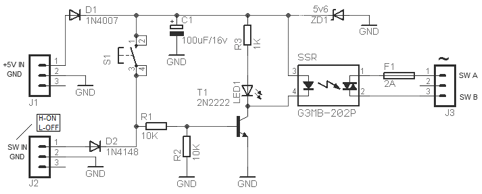
That looks very similar to what I traced on the board, there’s no zener diode (ZD1), D2, S1 or C1 but the rest is pretty much the same. So…why is it not working?
Next up, I started double checking components. The resistors marked 103 are 10K and 102 is 1K, the LEDs were obviously working fine, the G3MB-202P were fine, the resistance matched what the datasheet said. Even the input diode (D1) was ok…so, all that was left was the transistor (T1), it’s marked as “2TY”. I googled that and found the datasheet, which indicates this is a S8550 TRANSISTOR (PNP).
And here lies the problem: This circuit requires a 2N2222 or equivalent (i.e. 2N3904) NPN transistor. The current flows the “other way around” on a PNP transistor, so this was never going to work as advertised.
I bought four boards, with 8 transistors in total, they were all wrong.
To test my theory I lifted up one of the transistors and Frankenstein’ed in a 2N3904.
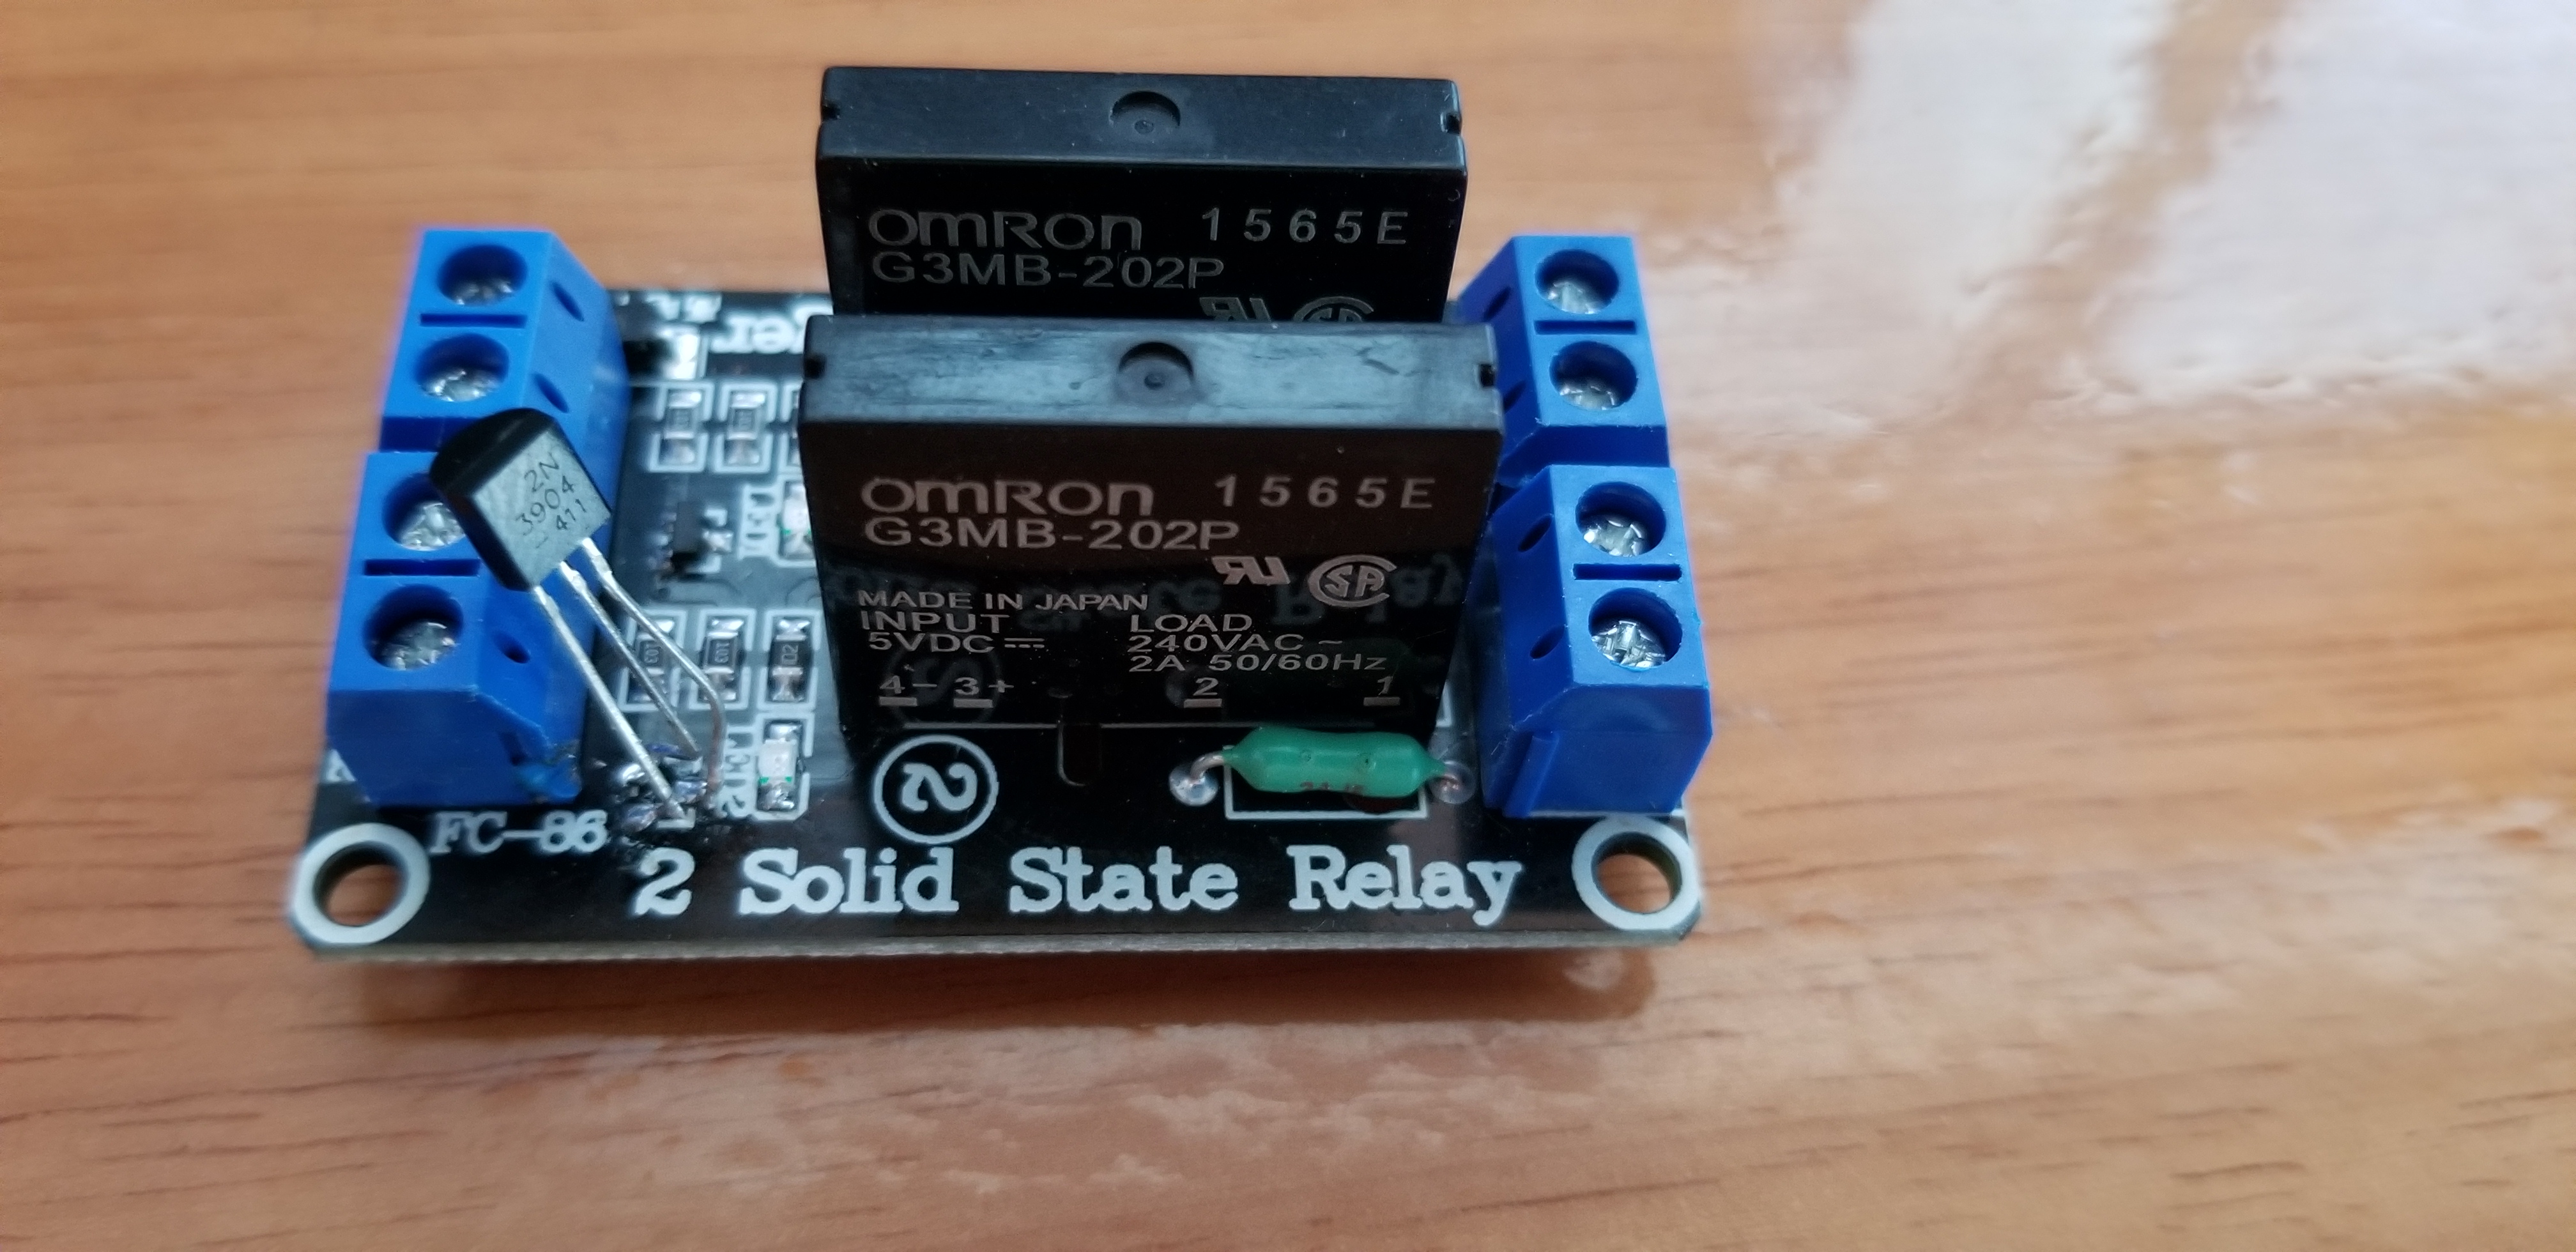
Sure enough, it did what it was supposed to. 5V on CH1 turns it on, GND turns it off. Light bulb or motor or anything that uses AC can be controlled just fine.
The epilogue on this pointless story is that after plugging it in a Sonoff Basic R2 modules, it was preventing it from booting up, because the pin you have available on the Sonoff must be kept high on boot (it’s used to indicate the boot mode to the bootloader)…So before I was finished I had to remove R2, and add a 2K pullup between 5V and CH1. Then, I was finally done.
I’ve been reading Fabien Sanglard’s excellent Game Engine Black Books, which go into the technical low level details of the groundbreaking games Wolfenstein and Doom, the IBM PC technology of the time, and the feats of engineering and out of the box thinking that turned office machines into mighty gaming systems.
The DOOM book in particular goes into many technical details of my personal favorite processor ever, Intel’s 486. Reading the book brought back many memories of working on my electronics engineering degree final project, an MP3 player based on a i486, plus a custom board with SRAM, auxiliary logic and a DAC, all designed and hand soldered by myself.
Working with no BIOS, I had to learn and create all the low level initialization routines, figure out how to bootstrap a system with only static RAM via JTAG, and many other fun engineering challenges (some of them still unresolved, like some ground plane issues that made the board unreliable).
Anyway, in celebration of the aforementioned books becoming free to download / pay what you want (but really, pay something because the books are great), I’m putting the project’s report and source code on Github. The report is entirely in spanish, maybe I’ll translate it in time to celebrate the Black Book on Quake.
Home Assistant addons are Docker containers that run alongside HA on your home automation hub (in my case a Raspberry Pi 3). They are typically based on Alpine Linux, and beyond Docker basics they have a few HA specific permissions and option settings mechanism that are documented here.
Continuing from my previous post on how to make Telegram based VOIP calls, I created a Home Assistant addon to do such a thing. The addon uses the code explained in my previous post, in conjunction with an MQTT client so it can be controlled from any automation script. Please refer to the README for setup and usage information.
Since compiling tgvoip and especially tdlib on target on the Raspberry Pi is next to impossible, I also created a small Docker environment to cross compile these binaries and placed the result under revision control as well (never do this at home kids!). The binaries can be rebuilt by running armhf/build-armhf.sh in case you don’t trust me and have a couple hours to spare watching the QEMU based cross compilation slowly inch forward. All the other platforms supported by Home Assistant will build the Telegram related dependencies from source code.
The Python code itself is not that much complex than the example in the previous post. I’ve added MQTT management, call disconnection, etc.
#!/usr/bin/env python3
# Telegram VOIP calls via mqtt
# Gabriel Jacobo <gabomdq@gmail.com>
# https://mdqinc.com
# License: zlib

import logging
import argparse
import os
import json
import base64
from telegram.client import Telegram as _Telegram
from telegram.utils import AsyncResult
from tgvoip import call_start, call_stop
import paho.mqtt.client as paho_mqtt

mqtt = paho_mqtt.Client()

class Telegram(_Telegram):
    def __init__(self, mqtt_client, *args, **kwargs):
        super().__init__(*args, **kwargs)
        self.mqtt = mqtt_client
        self.code = None
        self.call_id = None
        self.incoming_call_id = None
        self.add_handler(self._tghandler)

    def _call_start(self, data):
        # state['config'] is passed as a string, convert to object
        data['state']['config'] = json.loads(data['state']['config'])
        # encryption key is base64 encoded
        data['state']['encryption_key'] = base64.decodebytes(data['state']['encryption_key'].encode('utf-8'))
        # peer_tag is base64 encoded
        for conn in data['state']['connections']:
            conn['peer_tag'] = base64.decodebytes(conn['peer_tag'].encode('utf-8'))
        call_start(data)

    def voip_call(self, user_id):
        if self._authorized and self.call_id is None and self.incoming_call_id is None:
            r = self.call_method('createCall', {'user_id': user_id, 'protocol': {'udp_p2p': True, 'udp_reflector': True, 'min_layer': 65, 'max_layer': 65} })
            r.wait()
            self.call_id = r.update['id']

    def voip_call_stop(self):
        if self.call_id is not None:
            self.call_method('discardCall', {'call_id': self.call_id})

    def voip_call_answer(self):
        if self.incoming_call_id is not None:
            self.call_method('acceptCall', {'call_id': self.incoming_call_id, 'protocol': {'udp_p2p': True, 'udp_reflector': True, 'min_layer': 65, 'max_layer': 65} })

    def publish(self, topic, payload=""):
        self.mqtt.publish("telegram/" + topic, payload)

    def _tghandler(self, msg):
        #print ("UPDATE >>>", msg)
        if msg['@type'] == 'updateCall':
            data = msg['call']
            self.publish("call/%d/state" % data['id'], data['state']['@type'])
            if data['state']['@type'] == 'callStateReady':
                self.call_id = data['id']
                self.incoming_call_id = None
                self._call_start(data)
            elif data['state']['@type'] == 'callStatePending' and data['is_outgoing'] is False:
                # Incoming call
                self.publish("call/incoming", data['user_id'])
                self.incoming_call_id = data['id']
            elif data['state']['@type'] == 'callStateDiscarded':
                call_stop()
                self.call_id = None

    def _send_telegram_code(self) -> AsyncResult:
        # Wait for the code to arrive via mqtt
        self.publish("code/request")
        print ("Waiting for Telegram Auth Code via MQTT")
        while self.code is None:
            self.mqtt.loop()
        data = {
            '@type': 'checkAuthenticationCode',
            'code': str(self.code),
        }
        return self._send_data(data, result_id='updateAuthorizationState')

def mqtt_connect(client, userdata, flags, rc):
    client.subscribe("telegram/#")

# The callback for when a PUBLISH message is received from the server.
def mqtt_message(client, userdata, msg):
    payload = msg.payload.decode('utf-8')
    print(msg.topic+" "+payload)
    if msg.topic == "telegram/code":
        tg.code = payload
    elif msg.topic == "telegram/call":
        tg.voip_call(payload)
    elif msg.topic == "telegram/call/disconnect":
        tg.voip_call_stop()
    elif msg.topic == "telegram/call/answer":
        tg.voip_call_answer()

if __name__ == '__main__':
    parser = argparse.ArgumentParser()
    parser.add_argument('-c', '--config', help='Config File', default='/data/options.json')
    parser.add_argument('-d', '--data', help='Data Directory (if not provided it will be configured from the options file)', default=None)
    args = parser.parse_args()

    with open(args.config, 'rb') as config_file:
        config = json.load(config_file)

    files_dir = args.data if args.data is not None else config['data_dir']
    files_dir = os.path.join(os.path.expanduser(files_dir), config['phone'])
    tg = Telegram(
                api_id=config['api_id'],
                api_hash=config['api_hash'],
                phone=config['phone'],
                td_verbosity=3,
                files_directory = files_dir,
                database_encryption_key=config['database_key'],
                #use_test_dc = True,
                mqtt_client = mqtt,
                )

    mqtt.on_connect = mqtt_connect
    mqtt.on_message = mqtt_message
    mqtt.connect(config['mqtt_server'])

    tg.login()
    r = tg.get_chats()
    r.wait()


    while True:
        mqtt.loop()
Also included in the addon are a few bug fixes and workarounds in libtgvoip proper to allow for multiple calls in one script session. In the upstream version of tgvoip, random UDP ports were chosen for each incoming call. However, if you restrict the UDP port to a single value (a requirement stemming from the fact that Home Assistant addons only get the ports you specifically ask for open, or you have to use the host_network setting, which is asking for trouble), tgvoip isn’t able to establish a second call, so that had to be fixed. A minor fix to build against musl (the libc variant Alpine Linux uses) was also applied.
I’ve been experimenting with a Home Assistant based automation setup at home. It started as a mini greenhouse control temperature control and monitor system, and quickly evolved to a modest size system with a few devices. Using a combination of ESP8266s / ESP32s, Micropython and Arduino Framework code, I managed to connect my home alarm, a couple of doors and the HVAC system with relative ease and I once again felt the joy of unburdened programming …until I got to the doorbell.
That’s when, with my mind fueled by the home automation craze, I thought: “Hey, it’d be cool to be able to listen in on my doorbell from anywhere” (It seemed like a good idea at the time… you had to be there). Getting the sound to the Raspberry Pi that acts as the controller of the system would be relatively simple…but how to send the audio to my phone?
It turns out that there aren’t that many cross platforms that run on Linux (and ARM Linux at that!) and can do VOIP calls to Android or iOS. So I needed something that was easy to use, ran on ARM Linux and Android, preferably was open source, had security features and could be controller via scripting. Long story short: I didn’t find anything suitable, but! Telegram was almost a perfect fit, minus the easy to use part.
I had been using Telegram for quite some time for group messaging (and loving it), and I was marginally aware that their clients were open source and supported voice. So if I could somehow run their Linux client on the Raspberry Pi, I would be set. However, their desktop is not scripting friendly (or documented, at all), and their CLI client is mostly a test platform for APIs and doesn’t support voice calling (and it’s not documented, at all). Further, while they provide code for all the parts of the process, the examples and documentation are scattered through the internets and difficult to stumble across.
So, here’s how I did it.
Telegram has different APIs that allow you to talk to their servers and make calls: There’s the Telegram proper API, tdlib (a “simplified” wrapper library around the Telegram API), the bots API (a subset of the Telegram API is available for bots), and then tgvoip which does the VOIP part.
If you want to make calls, you have to get an app id, this would be like your custom Telegram client that “humans” can use, as opposed to bots. Login to apps is only allowed via a Telegram registered phone number and bots can not access VOIP calls (at least at the time of this writing).
The first piece of the puzzle is tdlib. If you look at Telegram’s core API, it’s complex. tdlib simplifies the interaction with this asynchronous API by providing another asynchronous API that manages all the low level implementation details (such as computing encryption key hashes, decrypting the database, etc). There are a few python wrappers for tdlib, the best one that I found in my opinion was python-telegram which I forked here with a couple minor fixes to be able to receive all of tdlibs messages in the user app, and to control tdlib’s verbosity level which is a good source of information when debugging issues. I recommend reading python-telegram’s tutorial to get an idea of how the wrapper works.
tdlib offers two methods of usage. The first one is by linking directly to its low level functions, the other one is via a (yes, yet another) JSON API called tdjson which is what the Python wrapper presented above uses.
Going beyond the basic tutorial, I started looking for VOIP tutorials, and came up empty. So going through tdlib’s API list of functions, a few that seemed interesting showed up: createCall, acceptCall, etc. I decided to give those a go, and actually got my phone to ring!
Sadly, that’s all it did. Because I was missing the second piece of the puzzle: tgvoip. This is the library that actually does the UDP or TCP connection, encryption, Opus encoding and decoding, etc. You have to glue this to tdlib (somehow!) in order to have fully working Telegram VOIP calls.
tgvoip is C++ based, and gluing it to Python requires a C module. Luckily for you, I’ve made such a thing and published it here as pytgvoip. It even includes a Dockerfile for you docker crazed kids (in my day we installed dependencies by hand! BY HAND!), and I included a quick and dirty example of how to use:
#!/usr/bin/env python3
# Telegram VOIP calls from python example
# Author Gabriel Jacobo https://mdqinc.com

import logging
import argparse
import os
import json
import base64
from telegram.client import Telegram
from tgvoip import call


def setup_voip(data):
    # state['config'] is passed as a string, convert to object
    data['state']['config'] = json.loads(data['state']['config'])
    # encryption key is base64 encoded
    data['state']['encryption_key'] = base64.decodebytes(data['state']['encryption_key'].encode('utf-8'))
    # peer_tag is base64 encoded
    for conn in data['state']['connections']:
        conn['peer_tag'] = base64.decodebytes(conn['peer_tag'].encode('utf-8'))
    call(data)

def handler(msg):
    #print ("UPDATE >>>", msg)
    if msg['@type'] == 'updateCall':
        data = msg['call']
        if data['id'] == outgoing['id'] and data['state']['@type'] == 'callStateReady':
            setup_voip(data)


if __name__ == '__main__':
    parser = argparse.ArgumentParser()
    parser.add_argument('api_id', help='API id')  # https://my.telegram.org/apps
    parser.add_argument('api_hash', help='API hash')
    parser.add_argument('phone', help='Phone nr originating call')
    parser.add_argument('user_id', help='User ID to call')
    parser.add_argument('dbkey', help='Database encryption key')
    args = parser.parse_args()

    tg = Telegram(api_id=args.api_id,
                api_hash=args.api_hash,
                phone=args.phone,
                td_verbosity=5,
                files_directory = os.path.expanduser("~/.telegram/" + args.phone),
                database_encryption_key=args.dbkey)
    tg.login()

    # if this is the first run, library needs to preload all chats
    # otherwise the message will not be sent
    r = tg.get_chats()
    r.wait()


    r = tg.call_method('createCall', {'user_id': args.user_id, 'protocol': {'udp_p2p': True, 'udp_reflector': True, 'min_layer': 65, 'max_layer': 65} })
    r.wait()
    outgoing = r.update

    tg.add_handler(handler)
    tg.idle()  # blocking waiting for CTRL+C
Essentially what this does is use tdlib to issue a createCall to a Telegram user_id (getting the user_id from the phone number is its own thing so I won’t explain it here but Google’s your friend). tdlib will initiate and negotiate the call for you (that’s when the other phone starts ringing!) and eventually send a updateCall callback to your handler with a callStateReady state. This means the other user picked up the call, and now we have to pass the call information to tgvoip, and eventually manage the disconnection (not shown here).
So I had calls to my phone from my Linux desktop script finally working. But if you remember my initial goal, I was still nowhere near it…how to get there will be the topic of my next post.
Stradjectives for Public Art League is a Meteor based web app we’ve developed at 2wav . Before starting, we knew that we wanted to create a modern HTML5+CSS3 app, prioritizing a dynamic behavior. Initially we started looking for open source projects that would allow us to create a Nodejs+Mongoose+Backbone+SocketIO solution in the short amount of time we had before the launch. Such alternatives do exist, but unfortunately none that were mature enough to pin our hopes and dreams on them. We did delve into Derbyjs initially, but sadly it proved too much for us to handle.
Then, along came Meteor. It provided everything we wanted, it has clear documentation, and where the documentation is not there, there’s a big community around it to help out. If you are looking to quickly develop a dynamic web app that “just works” and is fully data reactive, my advice is that you do give Meteor a chance.
Of course, when it came down to the implementation, some issues did come up. Wrangling the reactiveness of the app so you don’t get whole page re-renders for a minor change in the database is not trivial and it takes some time to figure out how it all works and what’s the best balance between reactiveness and performance/usability (this is a subject for another post, but let’s just say that you’ll eventually arrive at the conclusion that client side animations and data reactiveness are fundamentally at odds with each other).
Another problem we encountered with Meteor is that it’s very easy to add dependencies and before you notice it, the app gets fairly big, even with minification, gzipping, etc. This, added to the big images the app uses, required that we showed some sort of splash screen quickly upon access to prevent the user from thinking the site wasn’t responsive.
Meteor (at least as of version 0.6.2) has no functionality to do this, and no easy way to hack into its build system. What we ended up doing is a dirty hack, but one that should tide you over if you find yourself in the same spot, at least until an equivalent feature is properly implemented.
What we did is a monkey patch of sorts. Meteor fetches all the app dependencies and makes an “app.html” file that acts as the main file for your app (it loads all the CSS and Javascript). On our server code, we open that file, modify it to embed a base64 encoded image, and insert it “manually” in the document’s body (the document body doesn’t even exist at this point, so we create that too). The image is base64 encoded right into the html to make sure it’ll be shown before all the Javascript files are loaded. Otherwise, depending on the browser, the splash image can potentially be loaded after other files, thus taking longer to show up, defeating the purpose of having something show up right away.
The code is as follows:
There’s one minor side effect to this hack. When all is said and done, you end up with two body elements in your HTML. This didn’t prove to be a problem, we just remove the second one with:
$('body').eq(1).remove();
Every now and then I’m forced to exit the Candyland Paradise known as Python and I have to lower myself into the muddy waters of Javascript…the things I do for money.
Anyway, while developing an HTML5 app for 2wav, which makes heavy use of CSS3 transforms via the Barajas plugin (do check it out, it’s great), I found that trying to drag a card using jQuery UI’s draggable component doesn’t quite work. There’s even a bug report about it, which sadly is marked as “won’t fix”, so you have to resort to workarounds to make it behave as expected.
The workaround looks like this:
    $(li).draggable({
                        revert: true,
                        start: function() {
                            /* Temporarily revert the transform so drag and dropping works as expected */
                            var parentRect = $(this).parent()[0].getBoundingClientRect();
                            var rect = this.getBoundingClientRect();
                            /* cssBrowserPrefix is one of: -moz -webkit -o */
                            $(this).css(cssBrowserPrefix + 'transition', 'all 0 ease 0');
                            $(this).css('transform', 'none');
                            $(this).css('left', rect['left']-parentRect['left']);
                          },
                        stop: function() {
                          /* Revert the transformation changes done on start, if needed */
                        }
                    });
What this does is reset the transition (so the change is done immediately) and the transform properties, and replaces the former for the equivalent value in the left property. I’m not doing rotation, scaling or Y axis translation here, solving the problem in those cases may be a little more involved but the principle is the same.
As a side note, in case you are interested in knowing about the underlying technical details, the reason why draggable has problems with CSS transforms is because these transforms operate in a kind of “one way” after all the other CSS properties have been applied to the element (which probably stems from the fact that they are usually implemented using 3D hardware accelerated operations; that is the rotation, scaling and translation is done directly on the GPU). The bottom line is that if you use a translateX transform, the left CSS property will remain unaffected, given the transformation matrix is applied onto the element after it’s been positioned on the page according to all the other HTML and CSS rules.
While this method is way faster than computing and doing the transformation on the CPU, a common problem with this approach appears when eventually the user (and the browser itself, in case it needs to apply mouse interaction such as hovering) may need to know where the element ended up visually, for example, to drag it around. So, to get this final position you have to call getBoundingClientRect as illustrated in the code snippet.
I’ve looked everywhere for a good embeddable HTML+CSS rendering engine to integrate with my game engine Ignifuga, so my faithful users (all 3 of you!) could have the flexibility of developing GUIs (or even the whole game) using familiar concepts from the web development arena.
Webkit is nice, fast, well supported and extensively used for embedding, but it’s licensed under GPL, so it was of no use. Gecko has a more liberal license, but between contradictory reports of Mozilla pulling the plug on embedding support and the outdated documentation (and very complex API!), I felt that integrating it would be more work than I could take on, as neither of these engines are really oriented to the sort of use I had in mind.
Luckily, I found libRocket. It’s not strictly HTML+CSS, but it’s very, very similar, MIT licensed, and while it’s not very actively developed, it’s still mantained as far as I can tell. And it’s Python scriptable to boot! Folding the library into the Ignifuga build system proved to be simple enough (provided a few minor fixes that mostly solved path problems), and integration with the Python machinery is dead easy thanks to Boost (yes, I also had to bring along Boost…kinda sucks, but I’ve made a promise to myself to eventually work out a Cython based binding for libRocket).
Having cleared up those initial hurdles, it came down to integrate the libRocket renderer with SDL2, the user input and rendering backend (among other things) on top of which Ignifuga exists. SDL2 abstracts texture rendering across platforms, and internally it uses DirectX 9.0/OpenGL/GL ES/GL ES2 depending on what’s available on the target platform. libRocket provides a simple mechanism for integrating the renderer, and a few ready to use examples can be found in the source code and in their forums. In a nutshell, what you need to do is provide libRocket with functions to create textures from image files, to render a set of triangles, and to feed it user input.
Doing this proved to be difficult, as SDL can be used to do mostly everything required by libRocket, but it kept important stuff, such as the OpenGL textures, locked in internally (as it’s not designed to be integrated with 3rd party libraries in this particular way). So, with permission from Sam Lantinga I added a couple of useful functions that make this sort of integration possible (I’ve since heard of people trying to integrate Cairo in this same manner). The functions are SDL_GL_BindTexture and SDL_GL_UnbindTexture, which bind/unbind an SDL texture to the current OpenGL context, thus allowing regular OpenGL calls to operate on SDL created textures.
Using these functions, the relevant rendering code looks like this:
void RocketSDLRenderInterfaceOpenGL::RenderGeometry(Rocket::Core::Vertex* vertices, int num_vertices, int* indices, int num_indices, const Rocket::Core::TextureHandle texture, const Rocket::Core::Vector2f& translation)
{
    // SDL uses shaders that we need to disable here
    render_data.glUseProgramObjectARB(0);
    render_data.glPushMatrix();
    render_data.glTranslatef(translation.x, translation.y, 0);

    std::vector Positions(num_vertices);
    std::vector Colors(num_vertices);
    std::vector TexCoords(num_vertices);
    float texw, texh;

    SDL_Texture* sdl_texture = NULL;
    if(texture)
    {
        render_data.glEnableClientState(GL_TEXTURE_COORD_ARRAY);
        sdl_texture = (SDL_Texture *) texture;
        SDL_GL_BindTexture(sdl_texture, &texw, &texh);
    }

    for(int  i = 0; i < num_vertices; i++) {
        Positions[i] = vertices[i].position;
        Colors[i] = vertices[i].colour;
        if (sdl_texture) {
            TexCoords[i].x = vertices[i].tex_coord.x * texw;
            TexCoords[i].y = vertices[i].tex_coord.y * texh;
        }
        else TexCoords[i] = vertices[i].tex_coord;
    };

    render_data.glEnableClientState(GL_VERTEX_ARRAY);
    render_data.glEnableClientState(GL_COLOR_ARRAY);
    render_data.glVertexPointer(2, GL_FLOAT, 0, &Positions[0]);
    render_data.glColorPointer(4, GL_UNSIGNED_BYTE, 0, &Colors[0]);
    render_data.glTexCoordPointer(2, GL_FLOAT, 0, &TexCoords[0]);

    render_data.glTexEnvf(GL_TEXTURE_ENV, GL_TEXTURE_ENV_MODE, GL_MODULATE);
    render_data.glEnable(GL_BLEND);
    render_data.glBlendFunc(GL_SRC_ALPHA, GL_ONE_MINUS_SRC_ALPHA);
    render_data.glDrawElements(GL_TRIANGLES, num_indices, GL_UNSIGNED_INT, indices);
    render_data.glDisableClientState(GL_VERTEX_ARRAY);
    render_data.glDisableClientState(GL_COLOR_ARRAY);

    if (sdl_texture) {
        SDL_GL_UnbindTexture(sdl_texture);
        render_data.glDisableClientState(GL_TEXTURE_COORD_ARRAY);
    }

    render_data.glColor4f(1.0, 1.0, 1.0, 1.0);
    render_data.glPopMatrix();
    /* Reset blending and draw a fake point just outside the screen to let SDL know that it needs to reset its state in case it wants to render a texture */
    render_data.glDisable(GL_BLEND);
    SDL_SetRenderDrawBlendMode(renderer, SDL_BLENDMODE_NONE);
    SDL_RenderDrawPoint(renderer, -1, -1);
void RocketSDLRenderInterfaceOpenGLES::RenderGeometry(Rocket::Core::Vertex* vertices, int num_vertices, int* indices, int num_indices, const Rocket::Core::TextureHandle texture, const Rocket::Core::Vector2f& translation)
{
    render_data.glPushMatrix();
    render_data.glTranslatef(translation.x, translation.y, 0);

    std::vector Positions(num_vertices);
    std::vector Colors(num_vertices);
    std::vector TexCoords(num_vertices);
    float texw, texh;

    SDL_Texture* sdl_texture = NULL;
    if(texture)
    {
        render_data.glEnableClientState(GL_TEXTURE_COORD_ARRAY);
        sdl_texture = (SDL_Texture *) texture;
        SDL_GL_BindTexture(sdl_texture, &texw, &texh);
    }

    for(int  i = 0; i < num_vertices; i++) {
        Positions[i] = vertices[i].position;
        Colors[i] = vertices[i].colour;
        if (sdl_texture) {
            TexCoords[i].x = vertices[i].tex_coord.x * texw;
            TexCoords[i].y = vertices[i].tex_coord.y * texh;
        }
        else TexCoords[i] = vertices[i].tex_coord;
    };

    unsigned short newIndicies[num_indices];
    for (int i = 0; i < num_indices; i++) {
      newIndicies[i] = (unsigned short) indices[i];
    }

    render_data.glEnableClientState(GL_VERTEX_ARRAY);
    render_data.glEnableClientState(GL_COLOR_ARRAY);
    render_data.glVertexPointer(2, GL_FLOAT, 0, &Positions[0]);
    render_data.glColorPointer(4, GL_UNSIGNED_BYTE, 0, &Colors[0]);
    render_data.glTexCoordPointer(2, GL_FLOAT, 0, &TexCoords[0]);

    render_data.glTexEnvf(GL_TEXTURE_ENV, GL_TEXTURE_ENV_MODE, GL_MODULATE);
    render_data.glEnable(GL_BLEND);
    render_data.glBlendFunc(GL_SRC_ALPHA, GL_ONE_MINUS_SRC_ALPHA);
    render_data.glDrawElements(GL_TRIANGLES, num_indices, GL_UNSIGNED_SHORT, newIndicies);
    render_data.glDisableClientState(GL_VERTEX_ARRAY);
    render_data.glDisableClientState(GL_COLOR_ARRAY);
    render_data.glDisableClientState(GL_TEXTURE_COORD_ARRAY);

    if (sdl_texture) {
        SDL_GL_UnbindTexture(sdl_texture);
        render_data.glDisableClientState(GL_TEXTURE_COORD_ARRAY);
    }

    render_data.glColor4f(1.0, 1.0, 1.0, 1.0);
    render_data.glPopMatrix();
    /* Reset blending and draw a fake point just outside the screen to let SDL know that it needs to reset its state in case it wants to render a texture */
    render_data.glDisable(GL_BLEND);
    SDL_SetRenderDrawBlendMode(renderer, SDL_BLENDMODE_NONE);
    SDL_RenderDrawPoint(renderer, -1, -1);
void RocketSDLRenderInterfaceOpenGLES2::RenderGeometry(Rocket::Core::Vertex* vertices, int num_vertices, int* indices, int num_indices, const Rocket::Core::TextureHandle texture, const Rocket::Core::Vector2f& translation) {
SDL_Texture* sdl_texture = NULL;
    if(texture) render_data.glUseProgram(program_texture_id);
    else render_data.glUseProgram(program_color_id);
    int width, height;
    SDL_Rect rvp;
    SDL_RenderGetViewport(renderer, &rvp);

    GLfloat projection[4][4];

    // Prepare an orthographic projection
    projection[0][0] = 2.0f / rvp.w;
    projection[0][1] = 0.0f;
    projection[0][2] = 0.0f;
    projection[0][3] = 0.0f;
    projection[1][0] = 0.0f;
    //if (renderer->target) {
    //    projection[1][1] = 2.0f / height;
    //} else {
        projection[1][1] = -2.0f / rvp.h;
    //}
    projection[1][2] = 0.0f;
    projection[1][3] = 0.0f;
    projection[2][0] = 0.0f;
    projection[2][1] = 0.0f;
    projection[2][2] = 0.0f;
    projection[2][3] = 0.0f;
    projection[3][0] = -1.0f;
    //if (renderer->target) {
    //    projection[3][1] = -1.0f;
    //} else {
        projection[3][1] = 1.0f;
    //}
    projection[3][2] = 0.0f;
    projection[3][3] = 1.0f;

    // Set the projection matrix
    if (texture) {
        render_data.glUniformMatrix4fv(u_texture_projection, 1, GL_FALSE, (GLfloat *)projection);
        render_data.glUniform2f(u_texture_translation, translation.x, translation.y);
    }
    else {
        render_data.glUniformMatrix4fv(u_color_projection, 1, GL_FALSE, (GLfloat *)projection);
        render_data.glUniform2f(u_color_translation, translation.x, translation.y);
    }

    render_data.glEnable(GL_BLEND);
    render_data.glBlendFunc(GL_SRC_ALPHA, GL_ONE_MINUS_SRC_ALPHA);

    float texw, texh;

    unsigned short newIndicies[num_indices];
    for (int i = 0; i < num_indices; i++)
    {
      newIndicies[i] = (unsigned short) indices[i];
    }

    glVertexAttribPointer(ROCKETGLUE_ATTRIBUTE_POSITION, 2, GL_FLOAT, GL_FALSE, sizeof(Rocket::Core::Vertex), &vertices[0].position);
    glVertexAttribPointer(ROCKETGLUE_ATTRIBUTE_COLOR, 4, GL_UNSIGNED_BYTE, GL_TRUE, sizeof(Rocket::Core::Vertex), &vertices[0].colour);
    render_data.glEnableVertexAttribArray(ROCKETGLUE_ATTRIBUTE_POSITION);
    render_data.glEnableVertexAttribArray(ROCKETGLUE_ATTRIBUTE_TEXCOORD);
    render_data.glEnableVertexAttribArray(ROCKETGLUE_ATTRIBUTE_COLOR);

    if(texture) {
        sdl_texture = (SDL_Texture *) texture;
        SDL_GL_BindTexture(sdl_texture, &texw, &texh);
        render_data.glUniform1i(u_texture, 0);
        glVertexAttribPointer(ROCKETGLUE_ATTRIBUTE_TEXCOORD, 2, GL_FLOAT, GL_FALSE, sizeof(Rocket::Core::Vertex), &vertices[0].tex_coord);
    }
    else {
        render_data.glActiveTexture(GL_TEXTURE0);
        render_data.glDisable(GL_TEXTURE_2D);
        render_data.glDisableVertexAttribArray(ROCKETGLUE_ATTRIBUTE_TEXCOORD);
    }

    render_data.glDrawElements(GL_TRIANGLES, num_indices, GL_UNSIGNED_SHORT, newIndicies);

    /* We can disable ROCKETGLUE_ATTRIBUTE_COLOR (2) safely as SDL will reenable the vertex attrib 2 if it is required */
    render_data.glDisableVertexAttribArray(ROCKETGLUE_ATTRIBUTE_COLOR);

    /* Leave ROCKETGLUE_ATTRIBUTE_POSITION (0) and ROCKETGLUE_ATTRIBUTE_TEXCOORD (1) enabled for compatibility with SDL which
       doesn't re enable them when you call RenderCopy/Ex */
    if(sdl_texture) SDL_GL_UnbindTexture(sdl_texture);
    else render_data.glEnableVertexAttribArray(ROCKETGLUE_ATTRIBUTE_TEXCOORD);

    /* Reset blending and draw a fake point just outside the screen to let SDL know that it needs to reset its state in case it wants to render a texture */
    render_data.glDisable(GL_BLEND);
    SDL_SetRenderDrawBlendMode(renderer, SDL_BLENDMODE_NONE);
    SDL_RenderDrawPoint(renderer, -1, -1);
}
As you can see, there’s a fair amount of gymnastics involved in getting SDL to a state where it can be made to cooperate with libRocket. The full source code (including texture loading and input translation) is available in the Rocket* files in the Ignifuga source code. The libRocket fork Ignifuga uses is hosted at Github.
So far libRocket has proven to be very easy to use and more so because on top of it Ignifuga adds pQuery, a jQuery inspired set of utility functions, which makes animating libRocket a blast! (pun intended)
In the last few months I’ve been hard at work on my Python/Cython based game engine, Ignifuga, which I’m developing alongside a mysterious game project (by the way, do you know who is the gaucho?). The rationale behind my choice of language had several aspects to it. I was already familiar with Python, it’s a widespread language consistently in the top 5 of the most popular languages with a huge community behind it, and I felt there was no engine that did what I wanted my engine to have, that is be cross platform (at least Win/OS X/Linux and iOS / Android), data driven, simple to experiment and iterate changes. The cautionary tales about Python speed were written all across the web, but I figured that the Cython/Python combo will let me develop the engine first, and fine tune it later.
A couple of weeks ago I stumbled upon Haxe and more importantly across Haxe NME. Basically Haxe NME provides most of what I wanted to do, but it is centered on the Haxe language, which is very similar to Action Script 3. The Haxe compiler outputs (among others) CPP and Javascript code, and being mostly statically typed, the apps it produces are very fast, as proven by this benchmark, a variation of the BunnyMark
Those numbers wet my appetite to see what sort of results I would get with my own engine, so I made my version in pure Python in a couple of hours. Since Ignifuga is entity/component based, I created a number of entities with a sprite component attached, and in every update loop I moved them around. The results came, on my Ubuntu 12.04 i5 2500K system with a Nvidia GTX 570 and 302.17 binary drivers, at 30 FPS I got 1200 bunnies. So, what I had basically built was a low end smartphone emulator, seeing that I was getting worse figures than the Haxe BunnyMark ran on a LG Optimus One.
Remember when I said that I chose Python/Cython for the ease of implementation while retaining the opportunity to improve performance later on…well, it felt “later on” had arrived. Ignifuga has two big loops ran in succession, the entities update loop and the renderer loop. The first one is ran using greenlets, which is a sort of cooperative threading, and lets entities and components update themselves. The renderer loop iterates over the existing sprite components, intersecting their position with the current visible area, and those that fall in that zone are renderer to the screen using SDL. Almost every operation I just mentioned was done in Python, so this was a good starting point as any to start improving. To confirm my suspicions, I activated the basic profiling abilities that Python and Cython provide, and indeed I confirmed that every rendering loop was taking about 33 ms with 1200 bunnies on screen (that is, the entire alloted time for the frame).
You can see what the renderer update loop looked like before the optimization here. Thanks to Cython’s seamless integration with CPP, I quickly replaced all the Python dict/list iteration based code (which I believe was what was eating up most of the CPU time), with fast STL containers. I also added some extra intelligence to the code, to avoid intersecting rectangles excessively when the corresponding sprites hadn’t moved (which is useless for the BunnyMark as all sprites move every frame, but it’s useful for real apps). With this optimizations in place, I ran the benchmark again…and got some glorious 1400 bunnies on screen.
Sigh…time to profile the code again. This time, the renderer loop was at less than 1ms per frame, and the update loop was now eating all the CPU bandwidth (we are talking about A LOT of CPU bandwith!). Time to fix up the update loop using the same strategy, I removed dicts/lists and added STL containers, I called the Greenlet functions directly, etc. The benchmark now gave me an overwhelming 1600 bunnies…but now the CPU cycles went almost entirely to the bunnies.py update loop itself.
Being the competitive type of person that I am, I could not stop there. So, I made a Cython version of the Bunnymark. And to top that, I cheated. Yes, I confess…I cheated. As the Haxe NME manipulates the sprites positions directly, I decided to cut through all of the nice scaffolding I had built to make development easier and cleaner (each entity and its components have their own update loop, it’s all neat and cleanly separated, etc). This is the result, it creates a single entity, and then it clones the sprite component as many times as needed, and then it moves thos sprites around directly without bothering to go through the “proper channels”. The result now looked promising, 57.000 bunnies (versus the 1600 I had with the pure Python benchmark).
I then tested this benchmark on my other systems. On an ASUS Transformer TF101 I’m getting 2600 bunnies at 30 FPS (Haxe NME gets 4000), on an iPad 2 1600 bunnies at 30 FPS (extrapolating from the results published Haxe NME gets about 6000). The reason for this difference may lie in several places, I’m still going through some parts of Python code in time sensitive parts of my code, Ignifuga being an engine, I may have more scaffolding running at any given time than what the Haxe version has, etc. But overall I feel this is a very good result (specially seeing what I started with).
A nice advantage Cython includes is the ability to apply seamless parallelization where OpenMP is available (which seems to be Linux only). I’ve added a bit of this on my renderer loop (the part which intersects the sprite rectangles with the screen rectangles), and on the bunnies update loop (this is the OpenMP version of the Bunnymark). As a result, I got 60000 bunnies on my i5 2500k Linux system (3000 more than the non parallel version), to understand why I did not get more, it’s time to see a few profile dumps…
Ubuntu 12.04, i5 2500k, GTX 570, non parallel (1 CPU at 100% load), 57k bunnies
ncalls  tottime  percall  cumtime  percall filename:lineno(function)
        1   73.544   73.544  146.260  146.260 GameLoop.pyx:27(run)
     2223   62.774    0.028   62.838    0.028 Renderer.pyx:280(update)
     2271    9.398    0.004    9.796    0.004 GameLoopBase.pyx:263(_doSwitch)
        1    0.122    0.122    0.122    0.122 SDL.pyx:13(initializeSDL)
        1    0.120    0.120    0.120    0.120 Renderer.pyx:43(__init__)
      569    0.106    0.000    0.107    0.000 Canvas.pyx:228(text)
        3    0.065    0.022    0.065    0.022 Canvas.pyx:26(__init__)
     2223    0.064    0.000    0.064    0.000 Renderer.pyx:664(flip)
    57771    0.047    0.000    0.054    0.000 Renderer.pyx:341(addSprite)
      570    0.030    0.000    0.030    0.000 Renderer.pyx:371(removeSprite)
        1    0.018    0.018  146.524  146.524 {bunniesx.run}
   172229    0.018    0.000    0.018    0.000 Renderer.pyx:437(spriteDst)
   172229    0.015    0.000    0.015    0.000 Renderer.pyx:441(spriteRot)
   172229    0.014    0.000    0.014    0.000 Renderer.pyx:445(spriteColor)
     2268    0.011    0.000    9.872    0.004 GameLoopBase.pyx:291(_processTask)
    57771    0.008    0.000    0.008    0.000 Renderer.pyx:316(_indexSprite)
     2223    0.005    0.000    9.877    0.004 GameLoopBase.pyx:169(update)
Ubuntu 12.04, i5 2500k, GTX 570, OpenMP parallel (4 CPUs at about 25% load each), 60k bunnies
ncalls  tottime  percall  cumtime  percall filename:lineno(function)
        1   63.751   63.751  118.381  118.381 GameLoop.pyx:27(run)
     1763   48.222    0.027   48.268    0.027 Renderer.pyx:280(update)
     1810    5.868    0.003    6.278    0.003 GameLoopBase.pyx:263(_doSwitch)
        1    0.126    0.126    0.127    0.127 Renderer.pyx:43(__init__)
      593    0.112    0.000    0.113    0.000 Canvas.pyx:228(text)
        1    0.106    0.106    0.106    0.106 SDL.pyx:13(initializeSDL)
        3    0.067    0.022    0.067    0.022 Canvas.pyx:26(__init__)
    60195    0.048    0.000    0.056    0.000 Renderer.pyx:341(addSprite)
     1763    0.046    0.000    0.046    0.000 Renderer.pyx:664(flip)
      594    0.032    0.000    0.032    0.000 Renderer.pyx:371(removeSprite)
        1    0.019    0.019  118.637  118.637 {bunniesp.run}
   179451    0.017    0.000    0.017    0.000 Renderer.pyx:437(spriteDst)
   179451    0.016    0.000    0.016    0.000 Renderer.pyx:441(spriteRot)
   179451    0.014    0.000    0.014    0.000 Renderer.pyx:445(spriteColor)
     1807    0.011    0.000    6.356    0.004 GameLoopBase.pyx:291(_processTask)
    60195    0.008    0.000    0.008    0.000 Renderer.pyx:316(_indexSprite)
     1763    0.004    0.000    6.360    0.004 GameLoopBase.pyx:169(update)
As you can see, in both cases the renderer loop still eats up most of the frame time (27/28 ms out of the 33ms available for 30 FPS). There’s a key renderer detail to consider: the OpenGL function calls need to be serialized, they can’t be parallelized, so we’ve basically hit a bottleneck, the one brought forth the graphics card/driver performance. As a sidenote, this is the profile output of a much slower computer running Windows with a GTX 285 GPU and Nvidia drivers:
Windows 7, Q6600, GTX 285, no parallel, 61k bunnies (using SDL’s OpenGL backend)
ncalls  tottime  percall  cumtime  percall filename:lineno(function)
        1   50.177   50.177   90.285   90.285 GameLoop.pyx:27(run)
     1466   30.128    0.021   30.222    0.021 Renderer.pyx:280(update)
     1514    9.110    0.006    9.728    0.006 GameLoopBase.pyx:263(_doSwitch)
        1    0.225    0.225    0.225    0.225 Renderer.pyx:43(__init__)
      583    0.203    0.000    0.204    0.000 Canvas.pyx:228(text)
        3    0.140    0.047    0.140    0.047 Canvas.pyx:26(__init__)
     1466    0.094    0.000    0.094    0.000 Renderer.pyx:664(flip)
   176443    0.075    0.000    0.096    0.000 Renderer.pyx:437(spriteDst)
   176443    0.071    0.000    0.092    0.000 Renderer.pyx:441(spriteRot)
   176443    0.066    0.000    0.092    0.000 Renderer.pyx:445(spriteColor)
        1    0.061    0.061    0.061    0.061 SDL.pyx:20(terminateSDL)
    59185    0.027    0.000    0.096    0.000 Renderer.pyx:341(addSprite)
        1    0.023    0.023   90.644   90.644 {bunniesx.run}
      112    0.020    0.000    0.020    0.000 Log.pyx:46(log)
     1511    0.010    0.000    9.879    0.007 GameLoopBase.pyx:291(_processTask)

    59185    0.009    0.000    0.009    0.000 Renderer.pyx:316(_indexSprite)
     1466    0.004    0.000    9.882    0.007 GameLoopBase.pyx:169(update)
This clearly shows the sorry state of nVidia’s binary drivers for Linux. The Windows version of the drivers are much faster, evidenced by the fact that on a much slower computer, the non parallelized renderer loop takes 21ms and it shows 1K more bunnies than the parallel version under Linux. In this slower system, the CPU is now the limiting factor at 61k bunnies. On my faster i5-2500K system, using Windows (non parallel version) I get 127300 bunnies (more than double the amount of bunnies using the exact same hardware). I don’t have the profiling output for that one, but I believe the limit is again on the CPU.
In the near future I plan on experimenting with ZeroMQ for paralellization, as OpenMP’s support in Cython is seamless and very neat but it suffers from a two big problems…there’s very little support for it outside of Linux, and the runtime library is GPL licensed.
So, the cat, or should I say the chicken, is out of the bag! I’ve opened up the website for my pet project, a Python/SDL based 2D game engine called “Ignifuga”. You can check it out here.